Install TROME on your iPhone
This page takes you from a Mac with nothing set up to TROME on your own iPhone, built by you from its source code, with its Live Activity on your lock screen. At the end of this page the app shows sample trains: real ones need your own free key, which a second page adds. You need a Mac with Xcode, an iPhone with its cable, and a free Apple ID: no iOS experience, and nothing to pay. With a free Apple ID the app opens for 7 days at a time, and installing it again takes about 5 minutes. Plan on about an hour, plus the download of Xcode if you do not have it yet. You start by installing Xcode, and you get the code with one Terminal command.

The Terminal steps on this page were run from a fresh copy of the code. The Xcode and iPhone steps follow Apple’s pages, and nobody has followed them on a real iPhone from a clean start yet. Their screens are Apple’s and change with each version, so the page names each button and shows no picture of them. When a step does not match what you see, open an issue with the step and what you see.
What you need
Section titled “What you need”- A Mac that can run Xcode 27. Its page in the Mac App Store says if yours can. The Mac needs the internet.
- An iPhone with iOS 18 or later, and its passcode. To see the version, open Settings > General > About on the iPhone.
- A cable from the iPhone to the Mac. It must carry data, not only power: the cable that came with the iPhone does. The iPhone needs the internet once, to trust your app.
- A free Apple ID, with its password. Keep your other Apple device near you: Apple can send it a 6-digit code.
Install the app
Section titled “Install the app”Tick each step when it is done: the top of the list shows how many steps you have done.
Every Terminal command runs in the Terminal app. To open it, press Cmd + Space, type Terminal and press Return.
Get your Mac ready
Section titled “Get your Mac ready”-
Install Xcode 27, the Apple app that builds iPhone apps, from the Mac App Store. The download is large and can take a while. When it ends, Xcode is in your Applications folder.
-
Open Xcode, agree to the license, and let it install what it asks for. When it offers platforms to download, keep iOS ticked. When it is ready, Xcode shows its welcome window: quit Xcode with Cmd + Q.
-
In Terminal, check that Xcode is ready for the Terminal:
Fenêtre de terminal xcodebuild -versionIt prints
Xcode 27followed by a version number and a build number. When it prints an error instead, see what to do. -
In Terminal, check if you have Homebrew, the tool that installs the other tools of this page:
Fenêtre de terminal brew --versionIf it prints a version, go on to the next part. If not, install it with the command of brew.sh. It needs a Mac account that is an administrator, asks you to press Return, and then asks for your Mac password (nothing shows while you type it):
Fenêtre de terminal /bin/bash -c "$(curl -fsSL https://raw.githubusercontent.com/Homebrew/install/HEAD/install.sh)"It ends with a Next steps list: copy the lines under it, paste them into Terminal, press Return, then run
brew --versionagain.
Get the code
Section titled “Get the code”-
In Terminal, copy the code to your home folder and go into it:
Fenêtre de terminal cd ~git clone https://github.com/valfur03/trome.gitcd tromeWhen a window asks to install the command line developer tools, click Install, wait for it to end, and run the command again. Terminal prints
Cloning into 'trome'..., and you can type again when the copy is done. Runninglslists the foldersdocs,iosandserver.Each later Terminal command runs in this folder. When you open a new Terminal window, run
cd ~/tromefirst.
Choose the name of your app
Section titled “Choose the name of your app”Apple knows each app by its bundle ID, a name that no other app in the world has, such as io.github.janedoe.trome.dev.
The first time Xcode signs an app for your iPhone, which means that it adds the signature that lets the iPhone trust the app, it registers that name with your Apple ID.
Apple calls this record an App ID.
TROME has two parts that Xcode signs: the app, and its Live Activity, the part that draws on the lock screen. So one install registers 2 App IDs. A free Apple ID can register 10 App IDs in 7 days, and each one frees its place 7 days after it was registered. A normal install uses 2 of the 10.
So choose your name once, and keep it: a new name registers 2 new App IDs. When you reach the limit, Xcode says Your maximum App ID limit has been reached or No profiles for … were found. Then wait for a place to free up, or reuse App IDs that you registered before.
-
In Terminal, copy the settings file of the project and open the copy in TextEdit:
Fenêtre de terminal cp ios/Config/Local.example.xcconfig ios/Config/Local.xcconfigopen -e ios/Config/Local.xcconfigTextEdit shows a file with comments and two lines to fill in:
DEVELOPMENT_TEAM =andTROME_BUNDLE_ID_PREFIX = com.example. Git ignores this file, so it stays yours. -
Change
com.exampleto a prefix that only you use:io.github.and your GitHub name in lowercase. With no GitHub name, use any other name that only you would pick, such asme.janedoe. Use only lowercase letters, digits, hyphens and dots. Leave the lineDEVELOPMENT_TEAM =empty for now, then save (Cmd + S) and close the file.TROME_BUNDLE_ID_PREFIX = io.github.janedoeYour app is now called
<your prefix>.trome.dev. It ends with.dev, so it can never take the name of TROME on the App Store. -
In Terminal, install the tools and create the Xcode project:
Fenêtre de terminal make setupThe first run takes a few minutes, because it installs the tools that it needs. The last line shows your names:
Debug bundle IDs: app io.github.janedoe.trome.dev, Live Activity io.github.janedoe.trome.dev.widget
Sign in to Xcode and find your Team ID
Section titled “Sign in to Xcode and find your Team ID”-
Open Xcode, then choose Xcode > Settings… in the menu bar (or press Cmd + ,) and click Apple Accounts.
-
Click the + button at the bottom left, choose Apple Account, and click Continue. Sign in with your Apple ID, and type the 6-digit code if Apple sends one. The list of teams at the right shows Your Name (Personal Team): this is the free account that Xcode made from your Apple ID. Close the Settings window.
-
In Terminal, open the project:
Fenêtre de terminal open ios/TROME.xcodeprojXcode shows the project TROME.
-
In Xcode, in the left column, click the blue icon TROME at the top. In the middle, under TARGETS, click TROME, then click the tab Signing & Capabilities.
-
In the Team menu, choose Your Name (Personal Team). Xcode can show red errors, for example that your team has no devices yet: leave them. The next steps fix them, and an error that names Release is on purpose. When another error is still there after the whole install, look it up.
-
Quit Xcode with Cmd + Q, so that it saves the project.
-
In Terminal, find your Team ID, the code of your Personal Team:
Fenêtre de terminal grep -m 1 DEVELOPMENT_TEAM ios/TROME.xcodeproj/project.pbxprojIt shows a line like
DEVELOPMENT_TEAM = AB12CD34EF;. Your Team ID is the 10 letters and digits (hereAB12CD34EF). When the command shows nothing, see what to do. -
In Terminal, open your settings file again:
Fenêtre de terminal open -e ios/Config/Local.xcconfig -
After
DEVELOPMENT_TEAM =, type your Team ID, then save (Cmd + S) and close the file:DEVELOPMENT_TEAM = AB12CD34EF -
In Terminal, create the project again, so that it reads your team from the file:
Fenêtre de terminal make generateThe last line shows your names again. Run this command each time you change the settings file.
Connect the iPhone and turn on Developer Mode
Section titled “Connect the iPhone and turn on Developer Mode”Apple’s help: Pair devices using a cable, Enabling Developer Mode on a device and the “Trust This Computer” alert.
-
Connect the iPhone to the Mac with the cable, and unlock the iPhone. When the Mac asks if it can connect the accessory, click Allow. The iPhone asks Trust This Computer?: tap Trust, then type your iPhone passcode. When you see no question, go to the next step.
-
In Terminal, open the project again:
Fenêtre de terminal open ios/TROME.xcodeproj -
At the top of the Xcode window, open the run destination menu, which shows a device name such as “iPhone 17”, and choose Manage Devices…. The Device Hub window opens.
-
In the Device Hub, click your iPhone in the left column. When a Pair button shows, click it, then confirm on the iPhone when it asks, with Trust or with its passcode.
-
On the iPhone, open Settings > Privacy & Security, and scroll to the bottom. Under Security, turn on Developer Mode. When you do not find it, see what to do. The iPhone asks to restart: tap Restart.
-
When the iPhone starts again, unlock it. It asks if you want to turn on Developer Mode: tap Turn On, then type your passcode.
-
Look at the Device Hub on the Mac, and wait until your iPhone shows no message and no progress bar. The first time, Xcode copies files from the iPhone, which can take 10 minutes or more. Then close the Device Hub.
Run the app on your iPhone
Section titled “Run the app on your iPhone”Apple’s help: Run the app.
-
At the top of the Xcode window, open the scheme menu, which says what to build, and choose TROME. It sits at the left of the run destination menu, or in the same box. Then open the run destination menu and choose your iPhone.
-
Click the Run button (the triangle at the top left), or press Cmd + R. Xcode builds the app, which takes several minutes the first time, then puts it on the iPhone.
-
When the Mac asks for your password with a message like “codesign wants to access key…”, type the password that you use to log in to your Mac, and click Always Allow. The message can come two times: click Always Allow each time.
-
The first time, the app does not open, because the iPhone does not trust you yet. When the iPhone shows Untrusted Developer, tap Cancel. Xcode can also show an error that asks you to trust the certificate: this is normal. For any other error, look it up.
-
On the iPhone, open Settings > General > VPN & Device Management. Under Developer App, tap Apple Development: followed by your Apple ID email. Tap Trust “Apple Development: …”, then tap Trust again in the question. The iPhone needs the internet for this step.
-
In Xcode, click Run again. The app opens on your iPhone.
Open the app and see the Live Activity
Section titled “Open the app and see the Live Activity”-
The app asks to use your location. Tap Allow While Using App.
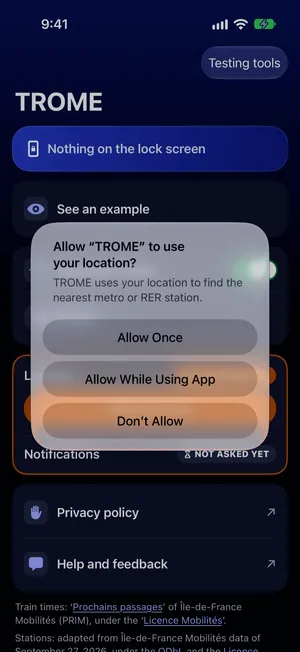
-
Right after, the app asks if it can also use your location when you do not use it. Tap Change to Always Allow. Then the app can tell you when you arrive at a station, also when it is closed. Help says what each choice does.
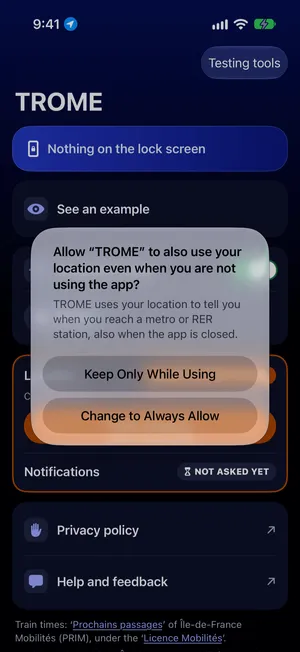
-
The app asks to send you notifications. Tap Allow. The app uses them to tell you when you arrive at a station.
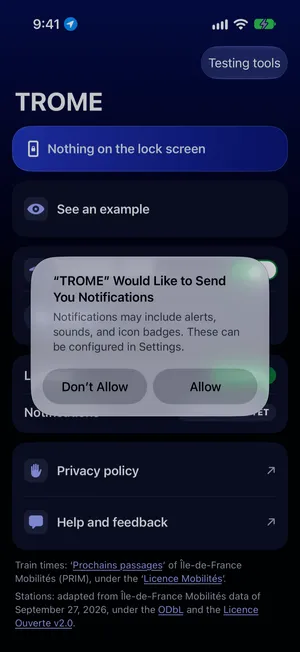
-
Look at the main screen of the app. It says Nothing on the lock screen, and has the row See an example, the Automatic mode, and the Location and Notifications rows. Both rows show a green pill when you allowed both.
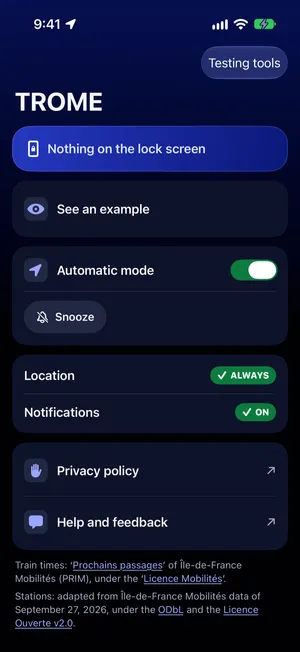
-
Tap See an example, then lock the iPhone with its side button and wake it. The lock screen shows the Live Activity of Châtelet, with sample times, in the same layout as the picture at the top of this page. When iOS asks if TROME can show Live Activities, tap Allow. The example ends after 10 minutes.


What you have now
Section titled “What you have now”TROME is on your iPhone, and See an example shows its Live Activity, with sample times, from anywhere.
At a real station, the app shows no train times yet. The real times come from PRIM, and the app that you build needs your own free key to ask for them. Add your own train data key before you go to a station.
The app on your iPhone makes the notifications and the Live Activity of your build, and a free Apple ID is enough for both.
Where to go next:
- Add your own train data key to see real trains, and to try the app at any station without going there.
- Help says how TROME decides when to show the Live Activity, and what the snooze and the pause do.
- Fix a problem with the install lists what can go wrong on this page, and what to do.